How to unittest internals
· 4980 days ago by Thijs Kroesbergen for Brokenwire.NET
This how-to is written by Mark Groot, and published on here on Brokenwire.net with his permission.
Normally when you try to unit test a method from an internal class, u will receive a message saying something like ‘… is inaccessible due to its protectionlevel’. The typical response in these kind of situations is either ‘ah, f.. it. I’ll just skip this test’ or ‘I’ll just make the class public. Who cares.’.
What you actually want to do is to make the internal method accessible to your unit test project. As it turns out, that this isn’t really all that difficult. Visual Studio will do most work for you. There are however a few things u have to keep in mind. In this article I will stretch out on those things.
First, let’s make a little console app which contains an internal class. (The entire solution can be downloaded here).
public interface ICoinFlip
{
  bool YouWon(bool choiceIsHead);
}


internal class CoinFlip : ICoinFlip
{
  public CoinFlip()
  {
  }

  bool ICoinFlip.YouWon(bool choiceIsHead)
  {
      // You can only win if you pick head
      // This is stupid, but that is not the point here
      return choiceIsHead;
  }
}

static void Main(string[] args)
{
  ICoinFlip flip = new CoinFlip();

  bool coinSideIsHead = (new Random()).Next(0, 2) == 1;

  if (flip.YouWon(true) == coinSideIsHead)
    Console.WriteLine("You win!");
  else
    Console.WriteLine("You lose!");
}
When you run this code you will get a nice little console window telling u whether or not you won.
Now how to test this? There are a few steps you have to take.
Let Visual Studio create a unittest and a unit test project for you.
You can create a unit test for the YouWon method by right-clicking the method and selecting ‘Create Unit Tests…’ from the contextmenu.
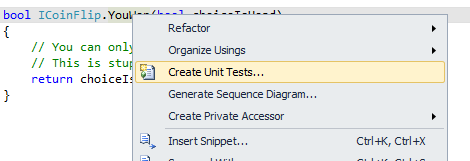
Clicking the menu option will popup the following window.
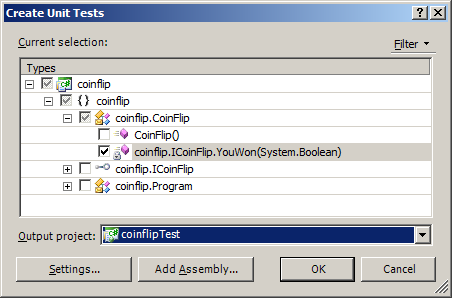
In the treeview you can select additional methods for which you want to create unit tests. You have to select a project from the listview in which the test has to be created.
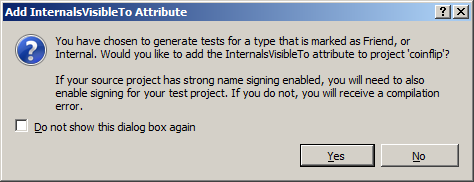
Now Visual Studio will create a test class for the selected method in your selected unit test project including all the necessary references.
Visual Studio will also add the assembly:InternalsVisibleTo attribute to the AssemblyInfo file of your console application.
[assembly: System.Runtime.CompilerServices.InternalsVisibleTo("coinflipTest")]
By using this attribute the unit test assembly will become a “friend assembly ” of the main assembly, and therefore the main assembly will allow the test assembly access to its internals.
Edit the test method
Visual Studio will generate a TestMethod in the new test class looking like this:
After some clean up the code looks like this:
[TestMethod()]
[DeploymentItem("coinflip.exe")]
public void YouWonTest()
{
  ICoinFlip target = new CoinFlip();
  bool choiceIsHead = false;
  bool expected = false;
  bool actual;
  actual = target.YouWon(choiceIsHead);
  Assert.AreEqual(expected, actual);
}
We enter the value false into the method and we expect to receive a value false back. If that is true, then the test passed.
The following steps are only necessary when you have a strongly signed project:
Find the public key of your unit test project
There was a time where finding the public key token using sn –T was enough. Now however, the InternalsVisibleTo attribute uses the public key.
We can retrieve that key in two steps by using the sn.exe tool.
First create a file with the public key from the assembly key file using the following command (inside a Visual Studio command prompt)
sn –p NameOfYourKeyFile.snk NameOfYourOutputFile.PublicKey.
Use the output file to retrieve the public key with the –tp option of sn.exe:
sn –tp NameOfYourOutputFile.PublicKey.
The result is some text and a large key looking like this:
Microsoft (R) .NET Framework Strong Name Utility Version 4.0.30319.1
Copyright (c) Microsoft Corporation. All rights reserved.Public key is
00240000048000009400000006020000002400005253413100040000010001003b825be7fe7e93
f782f0ff49cb2c86845698b15301834dc63cf9b9c62ea95aa02151a069cafb82f1902dfec1e2be
16b7f05d99e84a5796060d044ab62a1bcc6ffc7d12ab03827c22b4a70a67797bc82aea51a6c9b9
c31fee99410dbbc54b32dd9b18f202e97912b967120d4655a8575a2568738e7a08b662a0004440
91d500cfPublic key token is de3fc1b9aa83af40
Then add the key into the AssemblyInfo of the console application.
As we saw before, when we created the unit test the following entry was created in the AssemblyInfo file:
[assembly: System.Runtime.CompilerServices.InternalsVisibleTo("coinflipTest")]
You have to change this into:
[assembly: System.Runtime.CompilerServices.InternalsVisibleTo("coinflipTest, PublicKey=PASTE-YOUR-PUBLIC-KEY-HERE")]
Here you copy-paste the public key from the previous step into the marked section. You will have to remove the linebreaks, but that should be rather obvious. Don’t copy the key shown here, you have to use your own key…
To see if this works: build the project, and run the test.
Enjoy!

Equals is not Differs
· 5037 days ago by Thijs Kroesbergen for Brokenwire.NET
Just a small code snippet I wanted to share with you… (it made me laugh and cry at the same time)
public bool Equals(Adres a2)
{
    return !Differs(a2);
}

public bool Differs(Adres a2)
{
    return (a2 == null)
    || (this.Straat != a2.Straat)
    || (this.Huisnummer != a2.Huisnummer)
    || (this.Postcode != a2.Postcode)
    || (this.Plaats != a2.Plaats)
    || (this.DatumIngang != a2.DatumIngang)
    || (!this.DatumEinde.HasValue && a2.DatumEinde.HasValue)
    || (this.DatumEinde.HasValue && !a2.DatumEinde.HasValue)
    || (this.DatumEinde.HasValue && a2.DatumEinde.HasValue && (this.DatumEinde.Value != a2.DatumEinde.Value))
    ;
}
Watch, learn, don’t repeat. Share the pain in the comments.
Querying XML fields using t-sql
· 5043 days ago by Thijs Kroesbergen for Brokenwire.NET
Recently I got several questions about this topic, so I thought it would be nice to write a little bit about how to use XML inside SQL Server.
First of all: *don’t* query XML using substring(), pos() and other string manipulations. If you still do ugly stuff like that then you have to read this article and you also have to buy a big pie for your co-workers.
So we had this project where we had several nvarchar(max) fields which actually contained xml documents. This way of storing XML is fine when you don’t need to look inside the xml data itself. But when you want to use the data inside the xml documents its convenient to use the xml datatype. This datatype is available from Sql Server 2005 and up. In this post i’ll try to introduce you to the magical world of XML inside sql server.
All examples below are in this downloadable xmldemo.sql file, so you can easily try them yourself.
Xml Datatype
The Xml datatype allows you to perform several operations on the xml data from within t-sql. Although this is not very fast, it’s often better than round-tripping and doing the xml parsing in your application layers.
You can use the xml datatype just like any other datatype. You can use it for tables, table variables and also for regular variables and procedure/function parameters.
Example
This creates a table with one column of the xml datatype and inserts one row with a (simple) XML document:
create table #demo (field1 xml)
insert into #demo (field1)
values ('<document>
<header>Alphabet</header>
<items>
<item id="a">a is for apple</item>
<item id="b">b is for balloon</item>
</items>
</document>')
As you can observe the document structure is like this:
<document>
  <header>Alphabet</header>
  <items>
    <item id="a">a is for apple</item>
    <item id="b">b is for balloon</item>
  </items>
</document>
Now the cool thing is that there are several methods that can be executed on the Xml datatype, such as:
- Query
- Value
- Exists
- Modify
- Nodes
In this brief introduction I’ll highlight the usage of the Value and Query methods. All methods are well documented in the MSDN library.
Query
To get the “header” tag from our example xml document a query like this could be used:
select field1.query('/document/header') from #demo
This would return only the <header> element, with its contents. The language used to write the query is called “XQuery”, which is an XPath based query language defined by W3C. But be warned, only a subset of the official language is supported.
Say you’d like to get the xml node which has an “id” attribute with a value of “a”. You can use a query like this:
select field1.query('/document/items/item[@id="a"]') from #demo
This would return only the first of the two <item> elements, as an XML fragment in an XML field. If you are puzzeled by the syntax here, then please take a moment to look at these examples, that’ll give you a quick start.
Value
The value method is one of the methods that I personally have used the most. With this method you can select contents from an XML field and convert it to a “regular” sql datatype (also known as scalar values).
So…
select field1.value('(/document/items/item)[1]', 'nvarchar(max)') from #demo
Will return: “a is for apple”, because we asked for value of the the first [1] node that matched the “/document/items/item” expression.
But you can use these methods & expressions also in the WHERE clause of a t-sql query. Like so:
select * from #demo where field1.value('(/document/items/item)[1]', 'nvarchar(max)') like 'a%'
This statement would return all records which have an xml document in their “field1” column where the value first “item” tag starts with “a”. Please remember: this is nice but it will kill performance if you attempt this on a large table with loads of xml documents in it: in sql 2005 you cannot put indexes on values inside XML field! Sql server 2008 (and up) will let you create XML indexes as well.
Namespaces
One of the things I get asked most is how to query xml documents which have one or more xml namespaces associated.
So lets add another example record
insert into #demo (field1) values ('<document xmlns="http://www.brokenwire.net/xmldemo">
<header>Alphabet</header>
<items>
<item id="a">a is for apple</item>
<item id="b">b is for balloon</item>
</items>
</document>')
Please notice that the only difference is the addition of a namespace.
Running the first .value method example query on this record will return a NULL value. This is because the xml elements now live inside the “http://www.brokenwire.net/xmldemo” namespace, and the “/document/items/item” xpath expression looks for these elements without a namespace, so it doesn’t find anything in this document.
To be able to query with namespaces there are (at least) 2 possibilities. You can either completely ignore the namespaces and go directly to the elements you need, or you can declare the namespace and use it properly in your expressions.
The quick-and-dirty and I-don’t-care-about-namespaces way:
select field1.value('(//*[local-name()="item"])[1]', 'nvarchar(max)') from #demo
This expression will work for both the document WITH a namespace and the document WITHOUT a namespace.
The proper way:
select field1.value('declare namespace bw=http://www.brokenwire.net/xmldemo;
(/bw:document/bw:items/bw:item)[1]', 'nvarchar(max)') from #demo
This expression will only work for the document WITH the namespace, because in the other document the elements live in the default namespace.
More details
If you can’t get enough of this then this introduction to XQuery article on MSDN is worth reading too. You’ll need a lot more Xpath and Xquery knowledge than covered here to make really good use of the potential powers that are enabled by the xml datatype. Fortunately these are both standardized by W3C, so learning them will enable you to do much more cool stuff.
And don’t forget, you can post your ideas, notes, thoughts and “please send me the codez” requests in the comments, that’s what they are for.
File with demo code for download here.
How to Copy TFS Build Definitions
· 5142 days ago by Thijs Kroesbergen for Brokenwire.NET
First of all a question: Where is the copy option?
The answer: there is no copy option.
So because the Team Explorer doesn’t allow you to copy Build Definitions without manually copying all the fields I had to write a small tool to do so. In this post I’ll show you how that works.
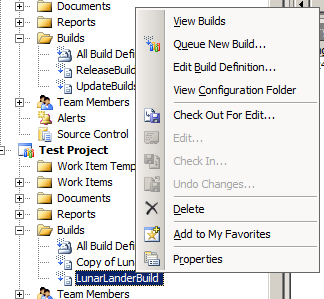
First of all, the user-friendly designed-by-a-developer user interface:
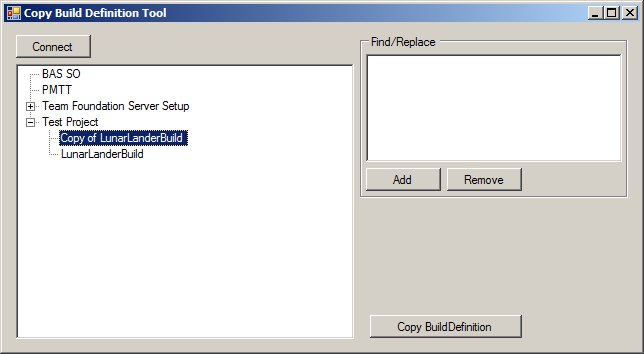
First you connect to the TFS server then you select the Build Definition that you’d like to copy. Optionally you can add some find/replace values and finally you hit the button. As easy as 1-2-3. The interesting bit is of course how this is done.
The tree view at the left hand side is populated by this little piece of code:
TeamFoundationServer tfs = TeamFoundationServerFactory.GetServer("http://xxx:8080");
buildDefTreeview.BeginUpdate();
buildDefTreeview.Nodes.Clear();
ICommonStructureService common = (ICommonStructureService)tfs.GetService(typeof(ICommonStructureService));
var projects = common.ListAllProjects();
IBuildServer buildServer = (IBuildServer)tfs.GetService(typeof(IBuildServer));
foreach (var project in projects.OrderBy(p => p.Name))
{
    var currentNode = buildDefTreeview.Nodes.Add(project.Name, project.Name);
    var buildDefinitions = buildServer.QueryBuildDefinitions(project.Name);
    foreach (var buildDef in buildDefinitions.OrderBy(b => b.Name))
    {
        var newNode = currentNode.Nodes.Add(buildDef.Name, buildDef.Name);
        newNode.Tag = buildDef;
    }
}
buildDefTreeview.EndUpdate();
Basically it connects to the TFS server and iterates through the projects. For each project the Build Definitions are queried and the results are added as child nodes to the tree.
Behind the the copy button this piece of code does the real super-time-saver magic:
IBuildDefinition original = (IBuildDefinition)buildDefTreeview.SelectedNode.Tag;
IBuildDefinition copy = original.BuildServer.CreateBuildDefinition(original.TeamProject);
copy.Name = FindReplace(original.Name);
if (copy.Name == original.Name)
{
    copy.Name = "Copy of " + original.Name;
}
copy.ConfigurationFolderPath = FindReplace(original.ConfigurationFolderPath);
copy.ContinuousIntegrationQuietPeriod = original.ContinuousIntegrationQuietPeriod;
copy.ContinuousIntegrationType = original.ContinuousIntegrationType;
copy.DefaultBuildAgent = original.DefaultBuildAgent;
copy.DefaultDropLocation = original.DefaultDropLocation;
copy.Description = original.Description;
copy.Enabled = original.Enabled;
copy.Schedules.AddRange(original.Schedules);
copy.Workspace.Mappings.AddRange(original.Workspace.Mappings);
foreach (var mapping in copy.Workspace.Mappings)
{
    mapping.ServerItem = FindReplace(mapping.ServerItem);
}
foreach (var retp in original.RetentionPolicies)
{
    copy.RetentionPolicies[retp.Key] = retp.Value;
}
copy.Save();
The FindReplace function takes care of replacing the values from the find/replace list. The copying of most properties is rather straightforward. Of the the things to take into account is that the paths to the workspace and the Build Script (ConfigurationFolderPath) have to exist before you copy (create) the build definition.
I use this tool on TFS2008, but converting this to TFS2010 shouldn’t be hard. Of course it would be nice to see this kind of functionality in the next version of the Team Explorer. Until then, you can save a lot of typing and mouse clicks (and $$$) by using a tool like this.
System.Timers.Timer still broken
· 5268 days ago by Thijs Kroesbergen for Brokenwire.NET
About one year ago I wrote about System.Timer.Timer and it’s exception silencing capabilities. Now the .NET framework version 4 is almost done I thought it would be nice to do the same test again on the brand new framework. And guess what? It’s still broken!
Just to be clear what’s happening here: when an exception is thrown in the .Elapsed event of a System.Timers.Timer object then the exception gets silenced by an empty catch block within the framework code surrounding this event. You can see the sample code for reproducing this in my previous post.
Now there are many discussions about the usage of empty catch blocks but the general opinion seems to be that empty catch blocks are usually a bad idea. So why is this not fixed yet?
There is even a Microsoft Connect bug for this issue, in which we are promised that this will be fixed in “a next version of the framework”. That bug was opened in 2007…
So, if you want .Net framework 4 to suck a little bit less: go HERE and vote for this bug. And remember: You ARE the framework ;)
Building .NET 1.1 projects with Team Foundation Server
· 5353 days ago by Thijs Kroesbergen for Brokenwire.NET
Recently Olav Kwakman and I collaborated for the challenge to build .NET 1.1 code with a TFS 2008 build environment.
After configuring the build server we asked Captain Google what to do, and we implemented approach two described in the following blog post but the important thing is that we added one extra feature.
In approach #2 of Nagaraju's blog he modifies the output directory by adding an <ItemGroup> in the build script and writes the output to that directory in the After Compile Target Group. The problem with this solution is that the list of file in the ItemGroup is being initialized before the solution is being build. Therefore when your solution output changes the build will not pick this up the first time around. (This is a common "issue" with listing files in itemgroups, many have been tricked into this problem before)
By creating the ItemGroup at runtime (using an CreateItem task) this problem will not occur. Here's how you do just that:
<CreateItem Include ="$(SolutionRoot)\**\bin\$(VS2003_Configuration)\**\*.*">
<Output ItemName ="VS2003_OutputFiles" TaskParameter="Include"/>
</CreateItem>
The complete build script will look like this:
<PropertyGroup> <VS2003_Devenv>$(ProgramFiles)\Microsoft Visual Studio .NET 2003\Common7\IDE\devenv.com</VS2003_Devenv> <VS2003_Configuration>Debug</VS2003_Configuration> </PropertyGroup> <Target Name="AfterCompile"> <Exec Command=""$(VS2003_Devenv)" "$(SolutionRoot)\Your .Net1.1 Solution.sln" /build $(VS2003_Configuration)" /> <CreateItem Include ="$(SolutionRoot)\**\bin\$(VS2003_Configuration)\**\*.*"> <Output ItemName ="VS2003_OutputFiles" TaskParameter="Include"/> </CreateItem> <MakeDir Directories="$(BinariesRoot)\$(VS2003_Configuration)" Condition="!Exists('$(BinariesRoot)\$(VS2003_Configuration)')" /> <Copy SourceFiles="@(VS2003_OutputFiles)" DestinationFiles="@(VS2003_OutputFiles->'$(BinariesRoot)\$(VS2003_Configuration)\%(RecursiveDir)%(Filename)%(Extension)')"/> </Target>
Of course it would be better not to build .NET 1.1 code anymore and just upgrade your projects to a newer version of the .NET framework. From our .NET build jungle Olav and I wish you happy coding...