Site updated
· 2010-08-25 15:26 by Thijs Kroesbergen for Brokenwire.NET
Just upgraded this site to a new version of textpattern. I think everything still works fine, but please leave a comment if you find anything suspicious.

How to Copy TFS Build Definitions
· 2010-06-29 16:17 by Thijs Kroesbergen for Brokenwire.NET
First of all a question: Where is the copy option?
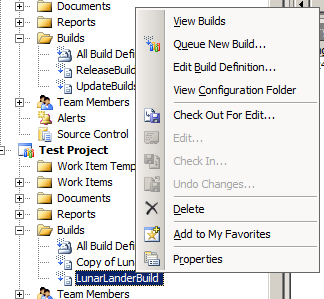
The answer: there is no copy option.
So because the Team Explorer doesn’t allow you to copy Build Definitions without manually copying all the fields I had to write a small tool to do so. In this post I’ll show you how that works.
First of all, the user-friendly designed-by-a-developer user interface:
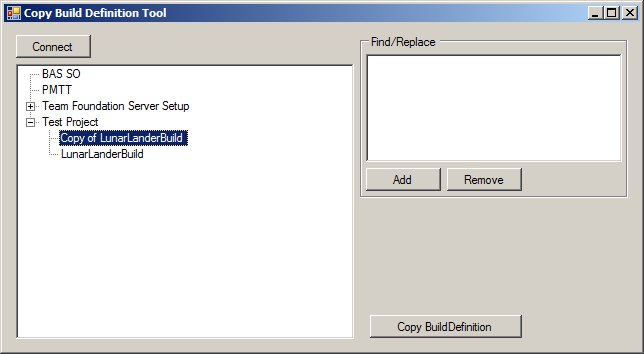
First you connect to the TFS server then you select the Build Definition that you’d like to copy. Optionally you can add some find/replace values and finally you hit the button. As easy as 1-2-3. The interesting bit is of course how this is done.
The tree view at the left hand side is populated by this little piece of code:
TeamFoundationServer tfs = TeamFoundationServerFactory.GetServer("http://xxx:8080");
buildDefTreeview.BeginUpdate();
buildDefTreeview.Nodes.Clear();
ICommonStructureService common = (ICommonStructureService)tfs.GetService(typeof(ICommonStructureService));
var projects = common.ListAllProjects();
IBuildServer buildServer = (IBuildServer)tfs.GetService(typeof(IBuildServer));
foreach (var project in projects.OrderBy(p => p.Name))
{
    var currentNode = buildDefTreeview.Nodes.Add(project.Name, project.Name);
    var buildDefinitions = buildServer.QueryBuildDefinitions(project.Name);
    foreach (var buildDef in buildDefinitions.OrderBy(b => b.Name))
    {
        var newNode = currentNode.Nodes.Add(buildDef.Name, buildDef.Name);
        newNode.Tag = buildDef;
    }
}
buildDefTreeview.EndUpdate();
Basically it connects to the TFS server and iterates through the projects. For each project the Build Definitions are queried and the results are added as child nodes to the tree.
Behind the the copy button this piece of code does the real super-time-saver magic:
IBuildDefinition original = (IBuildDefinition)buildDefTreeview.SelectedNode.Tag;
IBuildDefinition copy = original.BuildServer.CreateBuildDefinition(original.TeamProject);
copy.Name = FindReplace(original.Name);
if (copy.Name == original.Name)
{
    copy.Name = "Copy of " + original.Name;
}
copy.ConfigurationFolderPath = FindReplace(original.ConfigurationFolderPath);
copy.ContinuousIntegrationQuietPeriod = original.ContinuousIntegrationQuietPeriod;
copy.ContinuousIntegrationType = original.ContinuousIntegrationType;
copy.DefaultBuildAgent = original.DefaultBuildAgent;
copy.DefaultDropLocation = original.DefaultDropLocation;
copy.Description = original.Description;
copy.Enabled = original.Enabled;
copy.Schedules.AddRange(original.Schedules);
copy.Workspace.Mappings.AddRange(original.Workspace.Mappings);
foreach (var mapping in copy.Workspace.Mappings)
{
    mapping.ServerItem = FindReplace(mapping.ServerItem);
}
foreach (var retp in original.RetentionPolicies)
{
    copy.RetentionPolicies[retp.Key] = retp.Value;
}
copy.Save();
The FindReplace function takes care of replacing the values from the find/replace list. The copying of most properties is rather straightforward. Of the the things to take into account is that the paths to the workspace and the Build Script (ConfigurationFolderPath) have to exist before you copy (create) the build definition.
I use this tool on TFS2008, but converting this to TFS2010 shouldn’t be hard. Of course it would be nice to see this kind of functionality in the next version of the Team Explorer. Until then, you can save a lot of typing and mouse clicks (and $$$) by using a tool like this.
System.Timers.Timer still broken
· 2010-02-23 20:17 by Thijs Kroesbergen for Brokenwire.NET
About one year ago I wrote about System.Timer.Timer and it’s exception silencing capabilities. Now the .NET framework version 4 is almost done I thought it would be nice to do the same test again on the brand new framework. And guess what? It’s still broken!
Just to be clear what’s happening here: when an exception is thrown in the .Elapsed event of a System.Timers.Timer object then the exception gets silenced by an empty catch block within the framework code surrounding this event. You can see the sample code for reproducing this in my previous post.
Now there are many discussions about the usage of empty catch blocks but the general opinion seems to be that empty catch blocks are usually a bad idea. So why is this not fixed yet?
There is even a Microsoft Connect bug for this issue, in which we are promised that this will be fixed in “a next version of the framework”. That bug was opened in 2007…
So, if you want .Net framework 4 to suck a little bit less: go HERE and vote for this bug. And remember: You ARE the framework ;)
Fix: Virtualbox causes "Unidentified" network on Vista and Windows 7
· 2010-02-15 11:33 by Thijs Kroesbergen for Brokenwire.NET
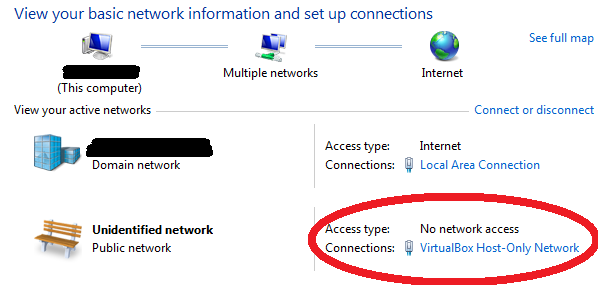
The problem:
When you install Virtualbox on Windows Vista or Windows 7 it will install an additional virtual network adapter on the host system. This “Virtualbox Host-Only Adapter” causes the Windows network detection to show an additional “unidentified” network. And while this “unidentified” network is present the windows firewall settings will stay on “Public”. This behavior is undesirable because you want to be able to switch your firewall settings based on your location (home/work/public).

The solution (manually):
WARNING; DANGER: THE REGISTRY IS NO PLAYGROUND, IF YOU DON’T UNDERSTAND WHAT YOU’RE DOING THEN DON’T DO IT!
Now we have that out of the way, here is what you should do:
1. Open regedit and navigate to HKLM\SYSTEM\CurrentControlSet\Control\Class\{4D36E972-E325-11CE-BFC1-08002BE10318}
2. Browse through the subkeys (named 0000, 0001, etc) until you find the subkey containing the virtualbox network adapter, this is the one where the “DriverDesc” key has “VirtualBox Host-Only Ethernet Adapter” as value.
3. Add a new DWORD value with a name of “*NdisDeviceType” and a value of “1”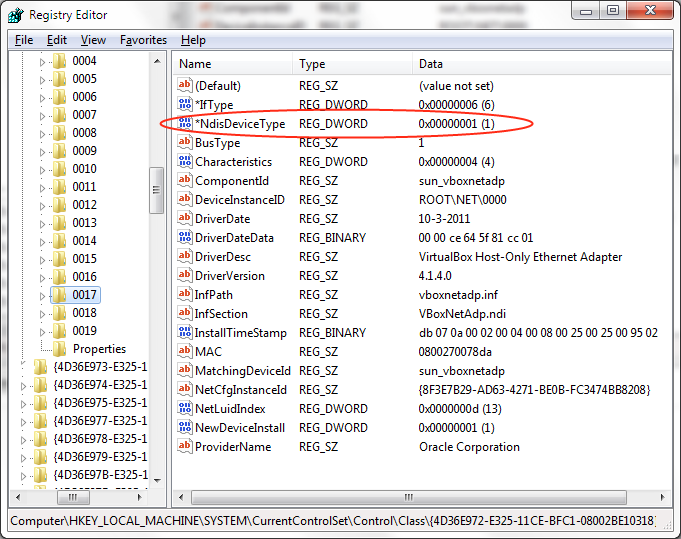
4. Disable en re-enable the virtuabox host-only network adapter, or alternatively reboot your pc.
The solution (PowerShell)
I hacked together this PowerShell script to easily re-do this trick after a virtualbox upgrade. The script has only been tested on my pc (and it works), use at your own risk. You need to run an elevated PowerShell shell to modify the registry.
$devices = "HKLM:\SYSTEM\CurrentControlSet\Control\Class\*"
$adapters = Get-ItemProperty $devices | Where-Object  {$_.Class -eq "Net"} | Foreach-Object { $_.PSPath }
Get-ChildItem $adapters -erroraction silentlycontinue | Foreach-Object { get-itemproperty -path $_.PSPath } | Where-Object {$_.ComponentId -eq "sun_vboxnetadp"} | Foreach-Object { Set-ItemProperty -path $_.PSPath -name "*NdisDeviceType" -Type DWORD -Value 1}
Get-WmiObject -Class Win32_NetworkAdapter | Where-Object {$_.Name -like "*Virtualbox Host*"} | Foreach-Object {$_.Disable(); $_.Enable()}
Why this registry fix fixes that:
There is actually an MSDN article that describes the possible registry keys for network adapters:
*NdisDeviceType The type of the device. The default value is zero, which indicates a standard networking device that connects to a network. Set *NdisDeviceType to NDIS_DEVICE_TYPE_ENDPOINT (1) if this device is an endpoint device and is not a true network interface that connects to a network. For example, you must specify NDIS_DEVICE_TYPE_ENDPOINT for devices such as smart phones that use a networking infrastructure to communicate to the local computer system but do not provide connectivity to an external network.
And
Note Windows Vista automatically identifies and monitors the networks to which a computer connects. If the NDIS_DEVICE_TYPE_ENDPOINT flag is set, the device is an endpoint device and is not a connection to a true external network. Consequently, Windows ignores the endpoint device when Windows identifies networks. The Network Awareness APIs indicate that the device does not connect the computer to a network. For end users in this situation, the Network and Sharing Center and the network icon in the notification area do not show the NDIS endpoint device as connected. However, the connection is shown in the Network Connections Folder.
More
Similar problem and similar fix for vmware:
http://aspoc.net/archives/2008/10/30/unidentified-network-issue-with-vmwares-virtual-nics-in-vista/
With a much nicer powershell script:
http://www.nivot.org/2008/09/05/VMWareVMNETAdaptersTriggeringPublicProfileForWindowsFirewall.aspx
And the virtualbox forums thread that pointed me in the right direction:
http://forums.virtualbox.org/viewtopic.php?f=6&t=17153#p73167
Christmas Lights updated
· 2009-12-11 17:40 by Thijs Kroesbergen for Brokenwire.NET
I just published a new version of the popular Christmas Lights. You can grab your free copy from the publish page right now.
So what’s new in this years update?
- New light bulbs: The new bulbs are bitmap based instead of “dynamic” WPF shapes, this reduces the CPU usage. And I think these look nicer too.
- Better stability: I resolved several issues which caused crashes when you changed the display resolution when the lights where active. Now you can also add/remove monitors while the lights are running.
- Plasma “burn-in” prevention: When this option is switched on the lights move a bit every minute so they don’t burn in your nice big plasma TV. :)
- Fully tested on Windows 7 but the lights will run on any pc having .NET framework 3.5(sp1). (This includes Windows XP, Vista, Server 2003)
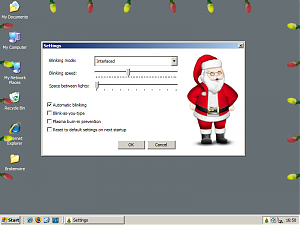
I’ve already got some nice ideas for a future version, but suggestions (or patches) are always welcome!
Possible features for a next version:
- Make the blinking speed dependant on the power level of your laptop battery: As the battery gets empty the lights should blink slower (or faster).
- Make the lights blink when sound is detected, so they can sync up with your favorite Christmas tunes.
- Create more blinking patterns and add a pattern to cycle through all other patterns.
So prepare your PC for the Christmas season and install the lights!
And if you are curious about the code that makes all that goodness happen, take a look at the “Wpf Christmas Lights” CodePlex project page. There you can also report bugs or post suggestions.
Happy Holidays!
Building .NET 1.1 projects with Team Foundation Server
· 2009-11-30 10:14 by Thijs Kroesbergen for Brokenwire.NET
Recently Olav Kwakman and I collaborated for the challenge to build .NET 1.1 code with a TFS 2008 build environment.
After configuring the build server we asked Captain Google what to do, and we implemented approach two described in the following blog post but the important thing is that we added one extra feature.
In approach #2 of Nagaraju's blog he modifies the output directory by adding an <ItemGroup> in the build script and writes the output to that directory in the After Compile Target Group. The problem with this solution is that the list of file in the ItemGroup is being initialized before the solution is being build. Therefore when your solution output changes the build will not pick this up the first time around. (This is a common "issue" with listing files in itemgroups, many have been tricked into this problem before)
By creating the ItemGroup at runtime (using an CreateItem task) this problem will not occur. Here's how you do just that:
<CreateItem Include ="$(SolutionRoot)\**\bin\$(VS2003_Configuration)\**\*.*">
<Output ItemName ="VS2003_OutputFiles" TaskParameter="Include"/>
</CreateItem>
The complete build script will look like this:
<PropertyGroup> <VS2003_Devenv>$(ProgramFiles)\Microsoft Visual Studio .NET 2003\Common7\IDE\devenv.com</VS2003_Devenv> <VS2003_Configuration>Debug</VS2003_Configuration> </PropertyGroup> <Target Name="AfterCompile"> <Exec Command=""$(VS2003_Devenv)" "$(SolutionRoot)\Your .Net1.1 Solution.sln" /build $(VS2003_Configuration)" /> <CreateItem Include ="$(SolutionRoot)\**\bin\$(VS2003_Configuration)\**\*.*"> <Output ItemName ="VS2003_OutputFiles" TaskParameter="Include"/> </CreateItem> <MakeDir Directories="$(BinariesRoot)\$(VS2003_Configuration)" Condition="!Exists('$(BinariesRoot)\$(VS2003_Configuration)')" /> <Copy SourceFiles="@(VS2003_OutputFiles)" DestinationFiles="@(VS2003_OutputFiles->'$(BinariesRoot)\$(VS2003_Configuration)\%(RecursiveDir)%(Filename)%(Extension)')"/> </Target>
Of course it would be better not to build .NET 1.1 code anymore and just upgrade your projects to a newer version of the .NET framework. From our .NET build jungle Olav and I wish you happy coding...